Part 1: Curves
Open a new Rhino File and practice the curves commands by completing the following steps. Organize your Rhino file so each step is clear. Use the Text command to label each step and the commands you used.
- Make the specific footprint below.
- Commands: Polyline
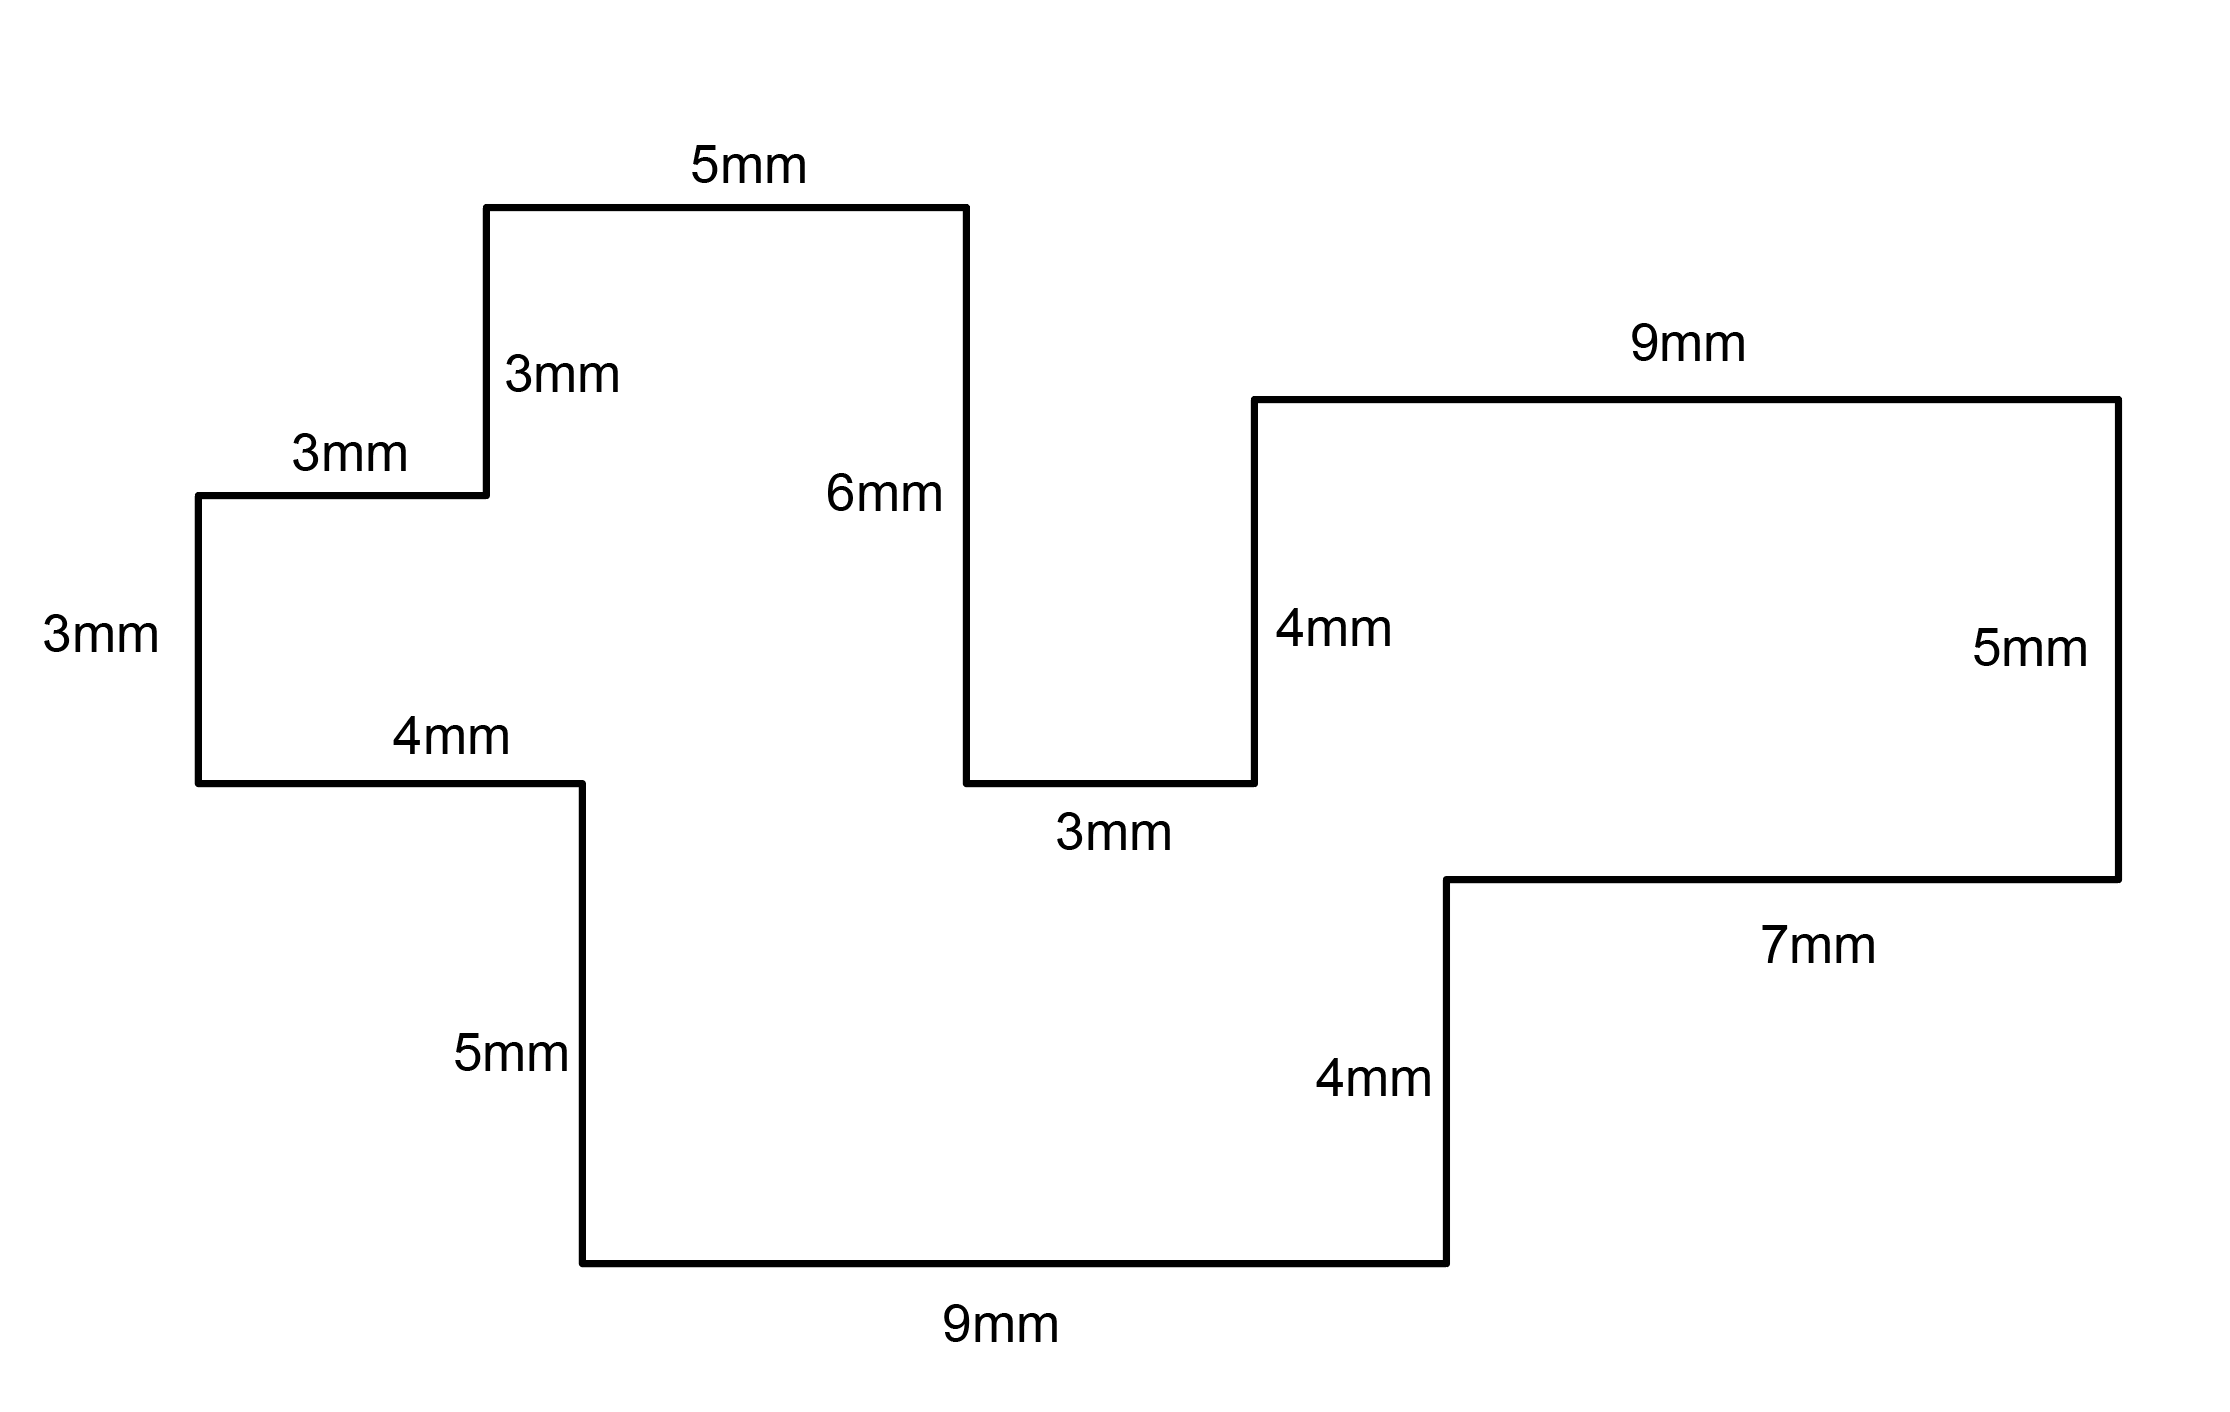

- Commands: Polyline
- Make 2 closed rounded curves using the various curve commands.
- Commands: Curve, InterpCurve, HandleCurve

- Make 2 closed curves using polygon, ellipse, or circle
- Commands: Circle, Ellipse, Polygon
-

- Make 2 open curves
- Commands: Curve, InterpCurve, HandleCurve, Sketch
-

- Import a picture and trace an image
- Commands: Picture, InterpCurve
-

- Pick one open curve, and one closed rounded curve and make three copies of each.
- Commands: Copy
-

- Take at least 3 of your closed curves and overlap them to create a new shape
- Commands: Move
-

- Use split, delete, and trim to combine these curves into one open curve
- Commands: Split, Delete, Trim, Join, Explode
-

- Take at least two curves and use various transformations make a pattern or composition.
- Commands: Move, Copy, Rotate, Mirror, Array, Scale, Offset, Fillet, FilletCorners

- Commands: Move, Copy, Rotate, Mirror, Array, Scale, Offset, Fillet, FilletCorners
- Organize your Rhino file so each step is clear. Use the Text command to label each step and the commands you used. Add a link to your FirstnameLastname_Curves file at this point in your post.
Part 2: Surfaces
Open a new Rhino File and practice the surfaces commands below by making two different surfaces for each command. Organize your Rhino file so each step is clear. You may want to use some of the curves you modeled in Part 1. Use the Text command to label each step and the commands you used.
- Plane
- PlanarSrf
- EdgeSrf
- ExtrudeCrv
-
- ExtrudeCrvAlongCrv
-
- Loft
- Sweep1
-
- Sweep2
-
- Revolve
-
- RailRevolve
-
- Add a link to your FirstnameLastname_Surfaces file at this point in your post.


Part 3: Solids
Open a new Rhino File and practice the solids commands below by making two different solids for each command. You may want to use some of the curves and surfaces you modeled in Parts 1 and 2. Organize your Rhino file so each step is clear. Use the Text command to label each step and the commands you used.
- Box
- Cylinder
-
- Sphere
-
- ExtrudeCrv and Cap
- Pipe
-
- MoveFace
-
- MoveEdge
- OffsetSrf
-
- BooleanUnion
-
- BooleanDifference
- Boolean Intersection
-
- BooleanSpli
-
- Using the surfaces and solids you modeled and the Boolean tools, make three solid shapes you find interesting.
 1
1 - Add a link to your FirstnameLastname_Solids file at this point in your post.


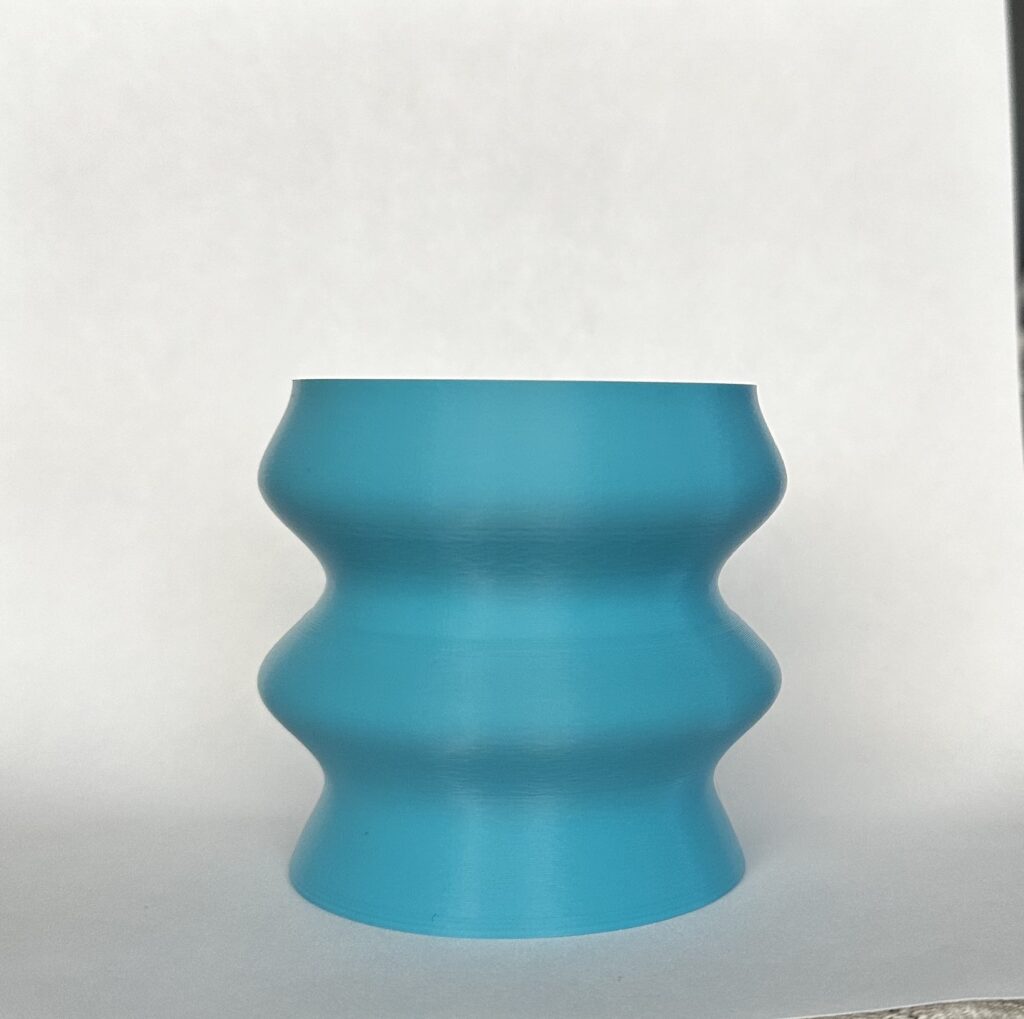
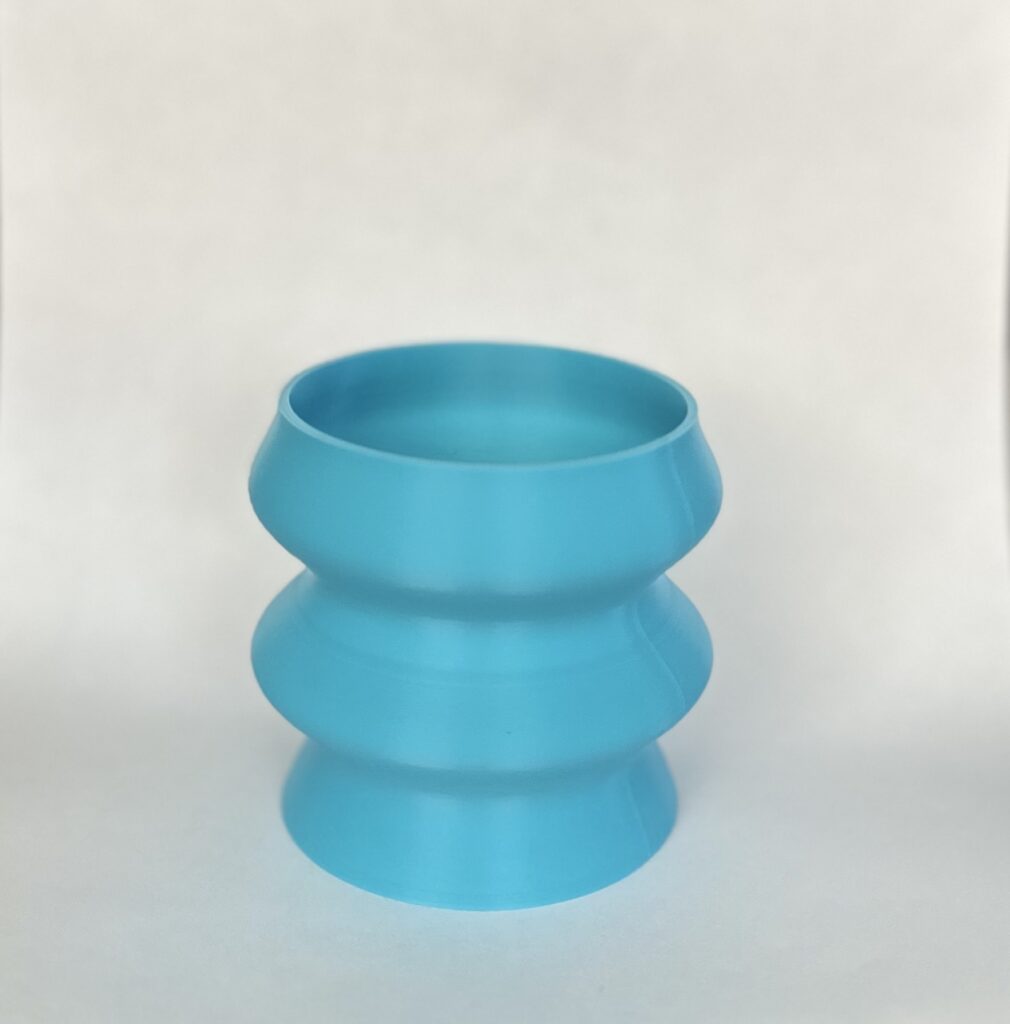
For my print I chose my third large object. It took about 5.5 hours to complete. This print came out very well and I had no snags in printing. I was very surprised how sturdy this shape came out because it chose to give it 2mm walls in rhino. I really like how symmetric shapes can be when using pipe, I was very tempted to to make really drastic diameter changes when using pipe but I did not want to have to use supports on my object. Also if anyone is having trouble removing prints or getting the first layer to stick to the plate a little bit of Elmers glue will do the trick😉

Hi Andrea,
It seems your’re part of the cat picture club too! I like the objects you modeled, particularly the objects for item #13. The one you printed looks like it printed in really good quality, and I love the color too. I would use something like this as a desk pencil holder or maybe as a planter.
I like your sky blue vase. Printing that without supports would realy scare me.Did you have any fears try to print it without supports or issues.
I also real like the item 13,1, the box with portholes.
Andrea,
I also had the same issue with my objects base no sticking to the plate after the first hour of my first print. I’ll have to make use of your tip of using the Elmers glue next time. I think all three of your objects from part 3, step 13 would result in really interesting prints. I wonder what changes need to be made to make the other two more feasible print.
Hello Andrea,
Incredible print, just very simple, very smooth, very demure. I really enjoyed seeing the surfaces and solids you created especially your Sweep’s. I had a very hard time getting those to look nice. Also, great tip on the glue, that was a mindful thing. Great post!
Justin
Hi Andrea! This is a great collection of work. Your final print is so clean and crisp its very enjoyable to look at. What’s funny is sitting on my kitchen table right now is a ceramics blue vase I made with almost the exact same shape. Do you have any intended purpose for the piece? Maybe it could be a small water bowl for your cat 🙂
Hello Andrea!
First,
The picture of (I assume) your cat that you interpreted in part 1 is amazing, it’s definitely what drew me into this post.
Further, you’ve made a lot of interesting shapes! I particularly liked your pipes and MoveEdge solids. For the interesting shape you printed, in the actual design, I’m surprised you chose not to use Loft. It really emphasizes what was briefly mentioned in lecture (that there are a lot of different ways you can do the same thing).
Good job!