Hi, I’m Nathan Rowe. I’m a Computer Science undergrad (with a Minor in Business Management) taking my final round of classes. I’ve spent a few years making things with a 3D printer and laser engraver and I’ve kind of always had an itch to learn
- How toolpaths are generated to realize a computed model into a physical object
- The limits of what can be created with algorithmic design
I also just want to get better at using tools similar to what I’ve already been utilizing. Given these motivations, I’ve been excited about taking this class ever since I found out about it in Fall 2023, so I’m pumped to finally have the opportunity to take it.
Inspiring Creation
Here’s a piece designed by Olaf Diegel, Ph.D. with his company ODD Guitars and manufactured by Forust: It’s a 3D-printed guitar made from sawdust and epoxy! I find the use of materials other than Nylon interesting on its own, so this is a cool piece to find in that right by itself. The two most compelling elements of this guitar are the unique use of material that I mentioned prior, and the design itself. I’ll get into the significance behind these two elements below.
Link: https://www.oddguitars.com/greenaxe.html
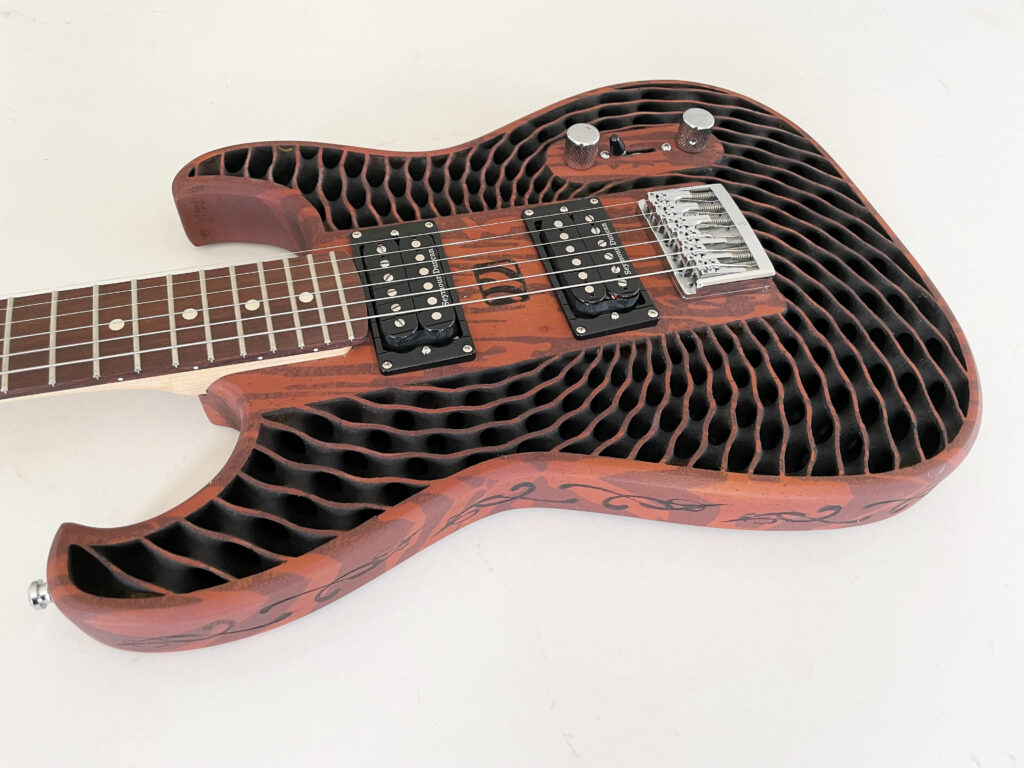
- Material and Printing Process: Since Forust uses a mix of sawdust and epoxy for the material, I was really curious HOW you 3D-print with something like that, considering that a filament printer (like what we’ll be using for our projects) relies on heating the filament into separate layers (I’m pretty sure you can’t make sawdust and epoxy bendy by heating it, comment if you disagree). A little research on Forust’s page reveals that they use a single-pass printer (whatever that is) for their prints, specifically the RAM 336 for mass production, which uses Binder Jetting with a powder filament to create physical pieces. Binder Jetting works by using the printhead to take the powder filament (sawdust) and combine it in a stream with a liquid solvent (epoxy mentioned earlier) to create a design layer-by-layer, similar to a filament printer. Very cool, and it’s a method that’s been around since the ’90s.
- Guitar Body Design: From the project’s description, the body is designed with a “diamond TPMS lattice structure” which turns out isn’t solely chosen for looks. According to the following site: [https://altair.com/blog/articles/types-of-lattices-for-additive-manufacturing-terms-engineers-need-to-know], lattices give an advantage in additive manufacturing (like 3D-printing) primarily because they reduce weight and improve durability. A TPMS lattice is a subset of a surface-based lattice, which is lingo for stating that it is generated from a trigonometric equation. I also presume that there is a benefit of reducing material and manufacturing time when using lattices. In short, lattices are pretty neat structures in computational fabrication.
That’s it from me, I look forward to learning more about all of this for the next few months! Also, Olaf Diegel is a professor who specializes in this kind of stuff (additive manufacturing). Check out some of their research if you’re interested.
This is a really fascinating project. I’d be curious to hear this guitar play, the lattice structure gives it a very distinctive look and I wonder if that has an effect on the sound it generates. I wonder if you could make acoustic guitar in a similar fashion or other instruments.
Nathan,
Its amazing how versatile 3D printing projects can be, such as this one in particular. Like Christopher mentioned as well, I wonder if there are any sound differences found in this print in comparison to a traditionally-made guitar. It seems like using different materials may require alterations to the model, shape, etc. Personally, I think that the reduced weight and improved durability aspects of this project are what stand out the most; I’m sure several musicians will appreciate that as instruments can often be very heavy.