Due Dates
Assignment due date: 9am, Tuesday September 10
Discussion due date: 9am, Thursday September 12
Assignment
This assignment (by Camila Friedman-Gerlicz) is designed to help you learn basic 3D modeling skills in Rhino. You will experiment with different ways to create geometry from curves, surfaces and solids.
Create a post on this website. Copy and paste the text of this page, from “Part 1: Curves” to “Part 3: Solids” into your post. For each item on the assignment list: complete the task. Then, take a screenshot of the relevant area of your Rhino file and add this image to your post, under the relevant number. If you have any comments about an item, feel free to add them under the relevant number. Attach your three completed and labeled Rhino files at the end of Parts 1, 2, and 3 respectively. Name your Rhino files according to the following convention: FirstnameLastname_Curves, FirstnameLastname_Surfaces, FirstnameLastname_Solids.
For Part 4: 3D Printing, write a few sentences (or more if needed) describing your 3D printing process. Include at least one image of your object during printing and at least 3 good pictures of your finished object. Note: 3D printing takes a long time and prints often fail. You should allocate a minimum of 24 hours to finish this part of your assignment.
Part 1: Curves
Open a new Rhino File and practice the curves commands by completing the following steps. Organize your Rhino file so each step is clear. Use the Text command to label each step and the commands you used.
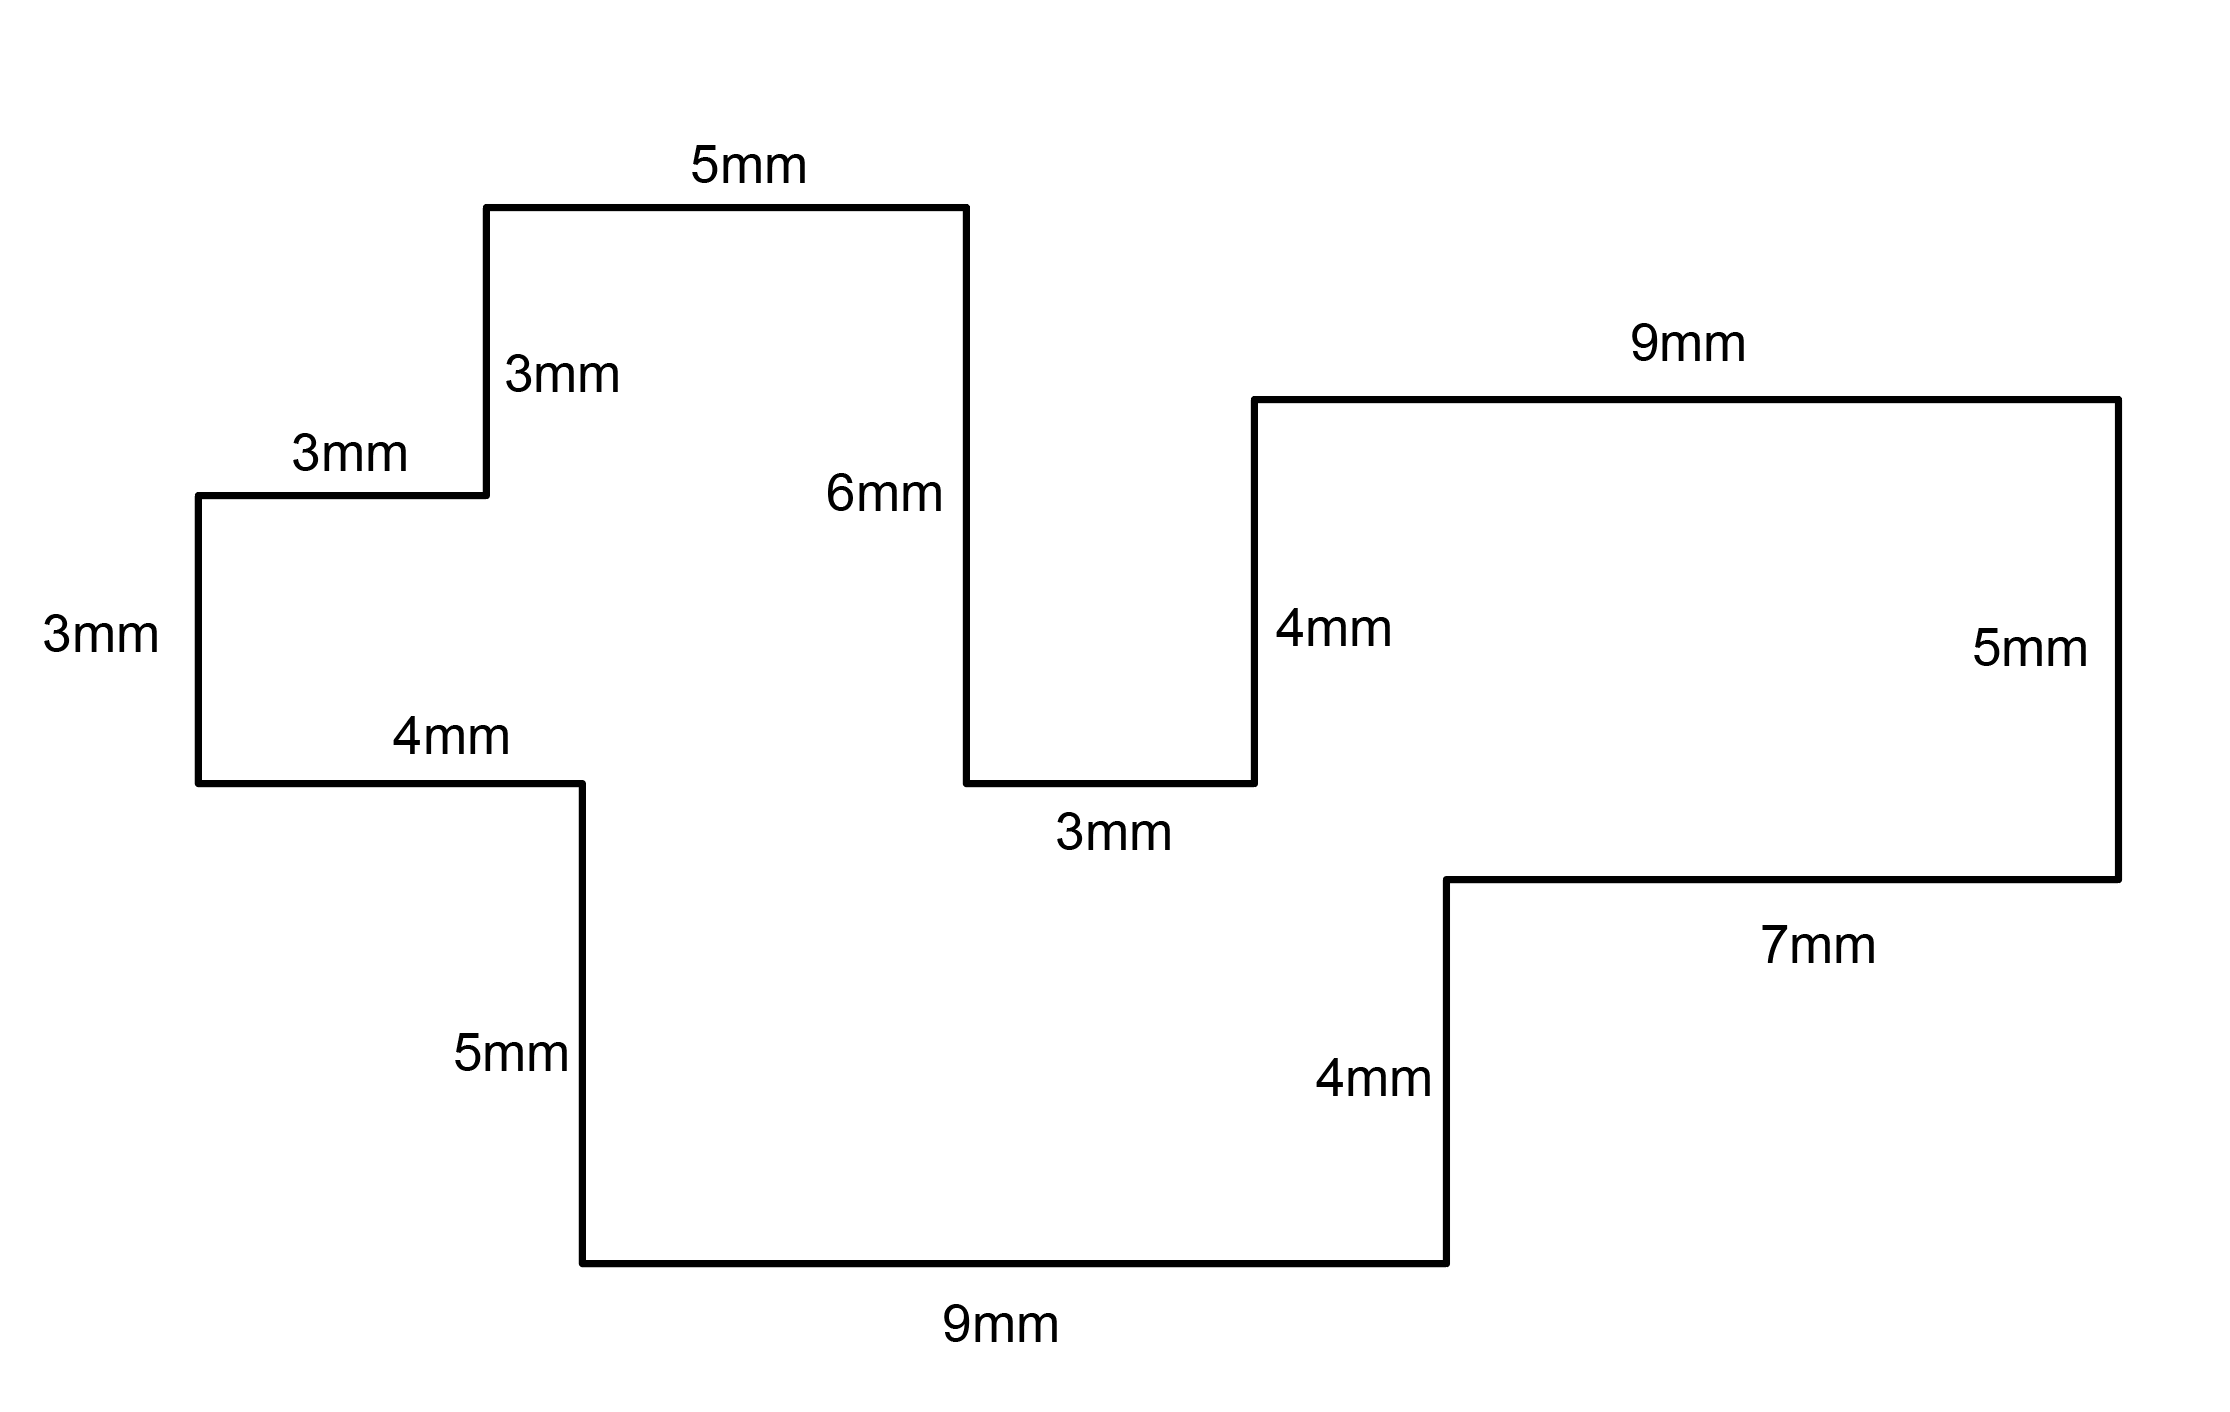
- Make the specific footprint below.
- Commands: Polyline
- Commands: Polyline
- Make 2 closed rounded curves using the various curve commands.
- Commands: Curve, InterpCurve, HandleCurve
- Make 2 closed curves using polygon, ellipse, or circle
- Commands: Circle, Ellipse, Polygon
- Make 2 open curves
- Commands: Curve, InterpCurve, HandleCurve, Sketch
- Import a picture and trace an image
- Commands: Picture, InterpCurve
- Pick one open curve, and one closed rounded curve and make three copies of each.
- Commands: Copy
- Take at least 3 of your closed curves and overlap them to create a new shape
- Commands: Move
- Use split, delete, and trim to combine these curves into one open curve
- Commands: Split, Delete, Trim, Join, Explode
- Take at least two curves and use various transformations make a pattern or composition.
- Commands: Move, Copy, Rotate, Mirror, Array, Scale, Offset, Fillet, FilletCorners
- Organize your Rhino file so each step is clear. Use the Text command to label each step and the commands you used. Add a link to your FirstnameLastname_Curves file at this point in your post.
Part 2: Surfaces
Open a new Rhino File and practice the surfaces commands below by making two different surfaces for each command. Organize your Rhino file so each step is clear. You may want to use some of the curves you modeled in Part 1. Use the Text command to label each step and the commands you used.
- Plane
- PlanarSrf
- EdgeSrf
- ExtrudeCrv
- ExtrudeCrvAlongCrv
- Loft
- Sweep1
- Sweep2
- Revolve
- RailRevolve
- Add a link to your FirstnameLastname_Surfaces file at this point in your post.
Part 3: Solids
Open a new Rhino File and practice the solids commands below by making two different solids for each command. You may want to use some of the curves and surfaces you modeled in Parts 1 and 2. Organize your Rhino file so each step is clear. Use the Text command to label each step and the commands you used.
- Box
- Cylinder
- Sphere
- ExtrudeCrv and Cap
- Pipe
- MoveFace
- MoveEdge
- OffsetSrf
- BooleanUnion
- BooleanDifference
- Boolean Intersection
- BooleanSplit
- Using the surfaces and solids you modeled and the Boolean tools, make three solid shapes you find interesting.
- Add a link to your FirstnameLastname_Solids file at this point in your post.
Part 4: 3D Printing
- Pick one of the shapes you created and 3D print it using your 3D printer. Note: to be able to print an object with the 3d printer, it must be watertight. That means that your shape must be a closed form with no naked edges and no holes.
- Export your model in the .stl file format. Import the .stl file into Cura and slice it, generating a .gcode file your printer can interpret.
- Your final print should be at least 3″ x 3″ x 3″ in size. Note: the print doesn’t have to be square, but the total volume should be approximately 9 in^3.
Discussion
See student posts here. Read and comment on the posts of at least three of your classmates.