by Daniel Morales-Garcia
Part 1: 2D Tiles – Process and Reflection
For the first part of this assignment, my aim was to create a set of 2D tiles that could be used to tile a plane without gaps or overlaps. The challenge was to manipulate the fundamental geometry of regular polygons to create a tiling pattern that not only aesthetically pleases but also adheres to the mathematical constraints of tiling a regular tile.
Designing the Triangular Tiles
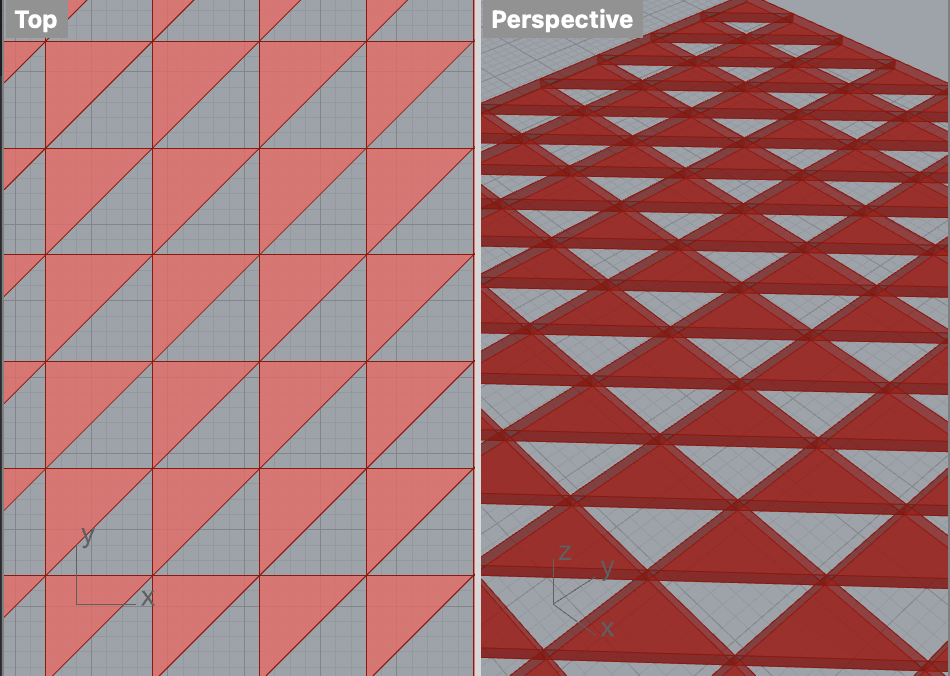
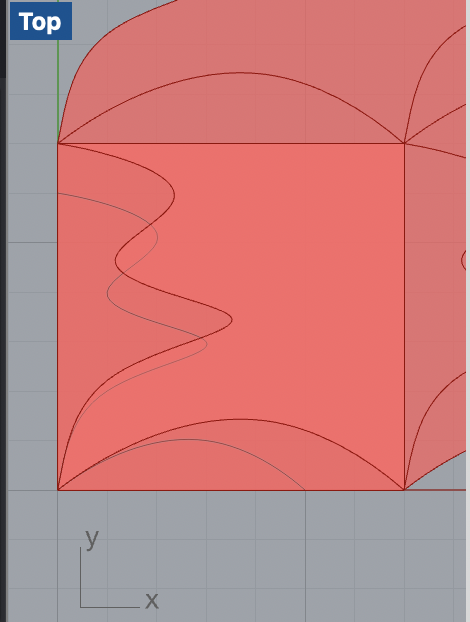
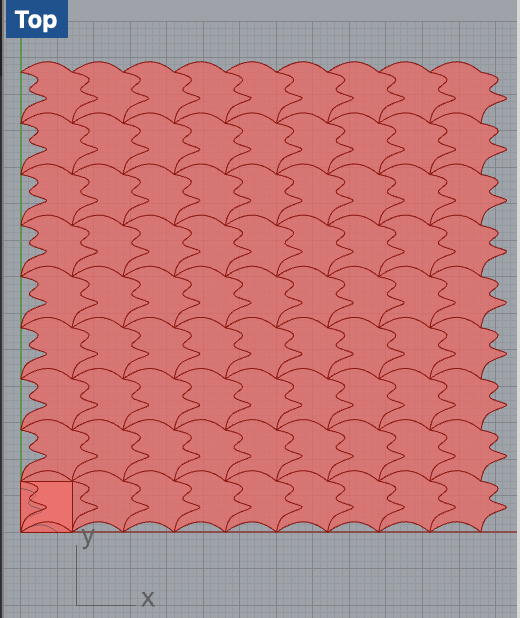
I leveraged the code we had developed in class for Escher tiling, and introduced a novel element to the mix: an additional line bisecting the tiles, which created a dynamic, geometric triangular pattern. The strategy was to edit the edges and vertices of a base tile, specifically a regular polygon (triangle) that would fit the criteria of one of the three Regular tilings. My primary focus was to ensure that when these tiles were replicated across a plane, they maintained the constraints we had discussed in class, namely, the strict rules that govern the uniformity and fit of tiling patterns.
Implementation and Code
The process began with defining the side lengths and angles of my base tile. I applied trigonometry to calculate the vertices positions and then used these points to draw the lines that would form the edges of my tiles. To achieve the complex tiling pattern, I duplicated and transformed these base lines across a grid, scaling and rotating them as necessary to fit together seamlessly.
For the colored tiling, I added another layer of complexity to my grasshopper file. After establishing a grid of lines, I introduced a checker pattern by assigning alternating colors to the tiles. This not only ensured that each tile was distinct but also enhanced the visual impact of the overall tiling. The resulting pattern (as seen in the results in the vessel on part 3) was a vibrant and complex tessellation that fulfilled the assignment’s formal requirements for 2D tiling.
Challenges and Learnings
One of the challenges I encountered was ensuring that the tiling pattern was mathematically sound, meaning no gaps or overlaps. To address this, I spent time adjusting the code to perfect the alignment and fit of each tile
Results
Part 2: 3D Printed 3D Tiles
Designing the 3D Tile
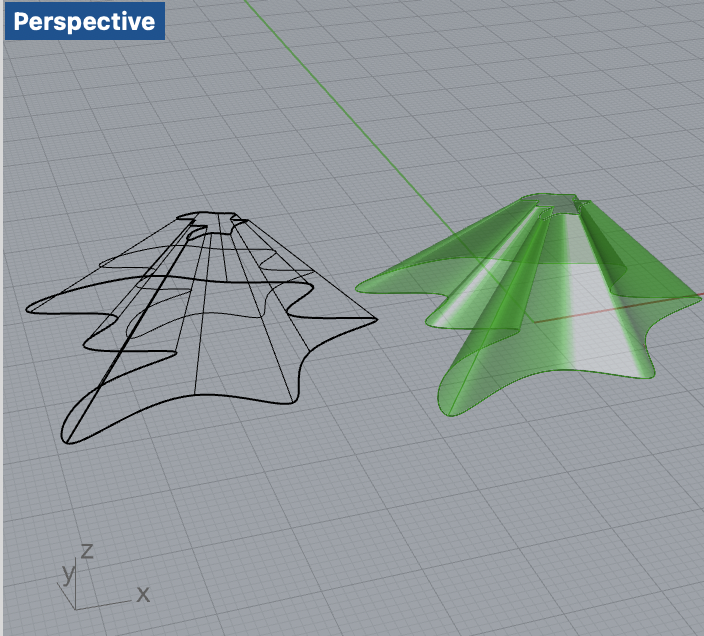
Using the Escher tiling code from class as a starting point, I crafted a 3D tile that would serve as the base for my new creation. The design process involved digitally sculpting the tile into a small mountain looking vessel, giving it a distinctive z-axis transformation that would add a unique aesthetic to the tile.
In Rhino, I manipulated the Escher tile, scaling it down to create a smaller version, which I then positioned on top of the original tile. This method created a ascending effect, reminiscent of a mountain, which provided the geometric change in the z direction.
Implementation and 3D Printing
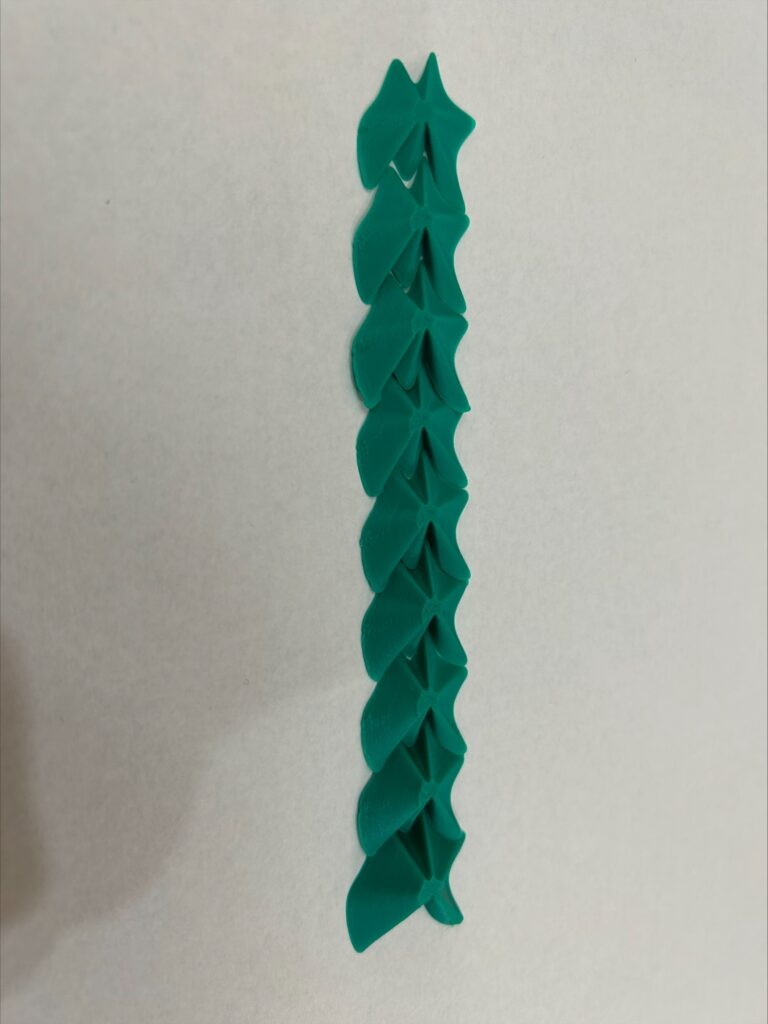
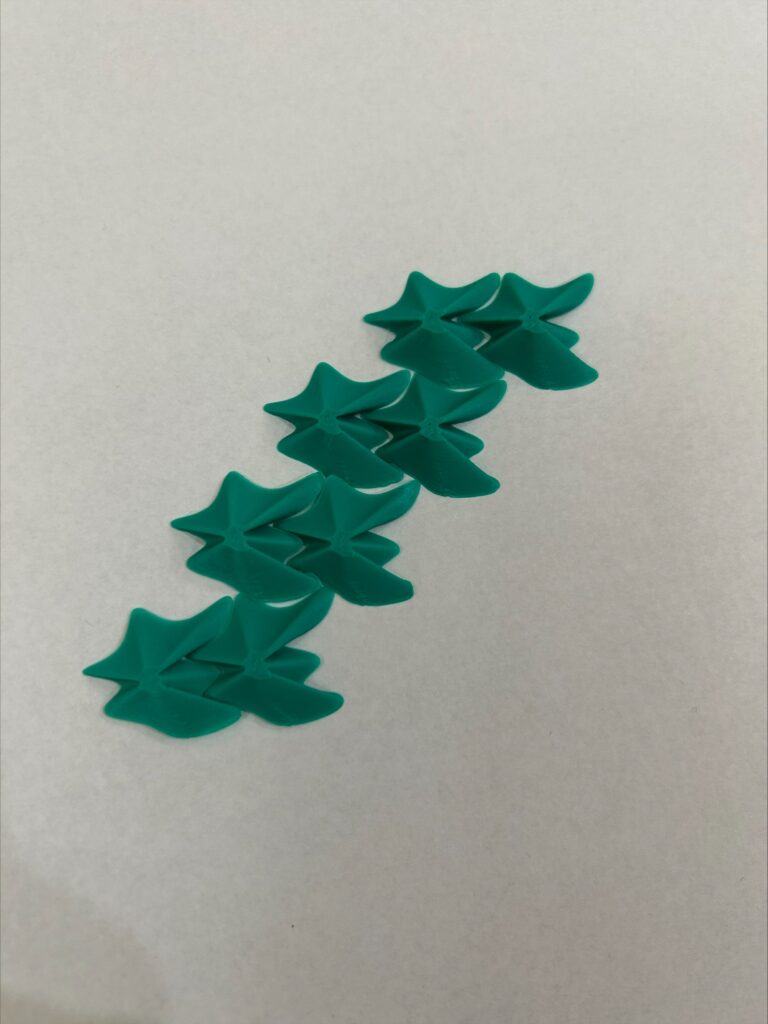
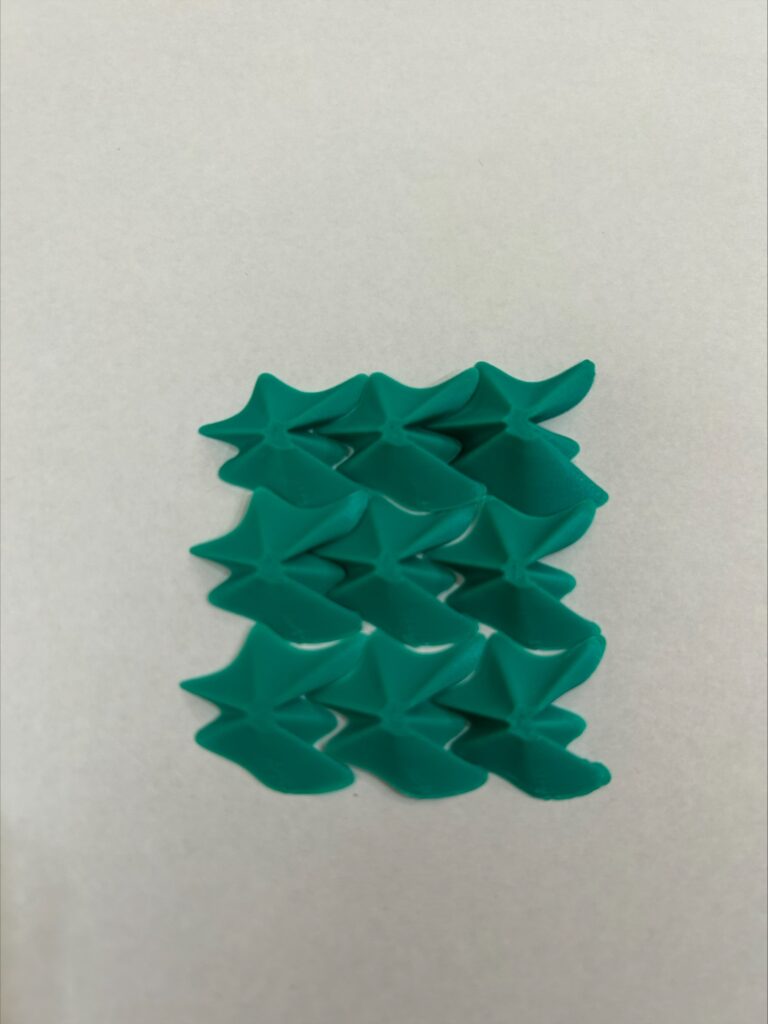
After finalizing the design in Rhino, I exported the tile model for 3D printing. The 3D printing process required calibration to ensure that the physical tiles would fit together just as seamlessly as their digital counterparts. I printed multiple copies of the tile, each 1″ x 1″ in size, to demonstrate the feasibility of the tiling in a tangible form.
I arranged the printed tiles in various configurations, documenting each layout to showcase the versatility and uniformity of the tiling. This step was crucial to prove that the 3D tiles not only had visual appeal but also functioned as a coherent system, just like traditional 2D tiles.
Challenges
One of the most significant challenges I faced was ensuring the 3D printed tiles would interlock without gaps or overlaps.
Results
Part 3: Surface Morph
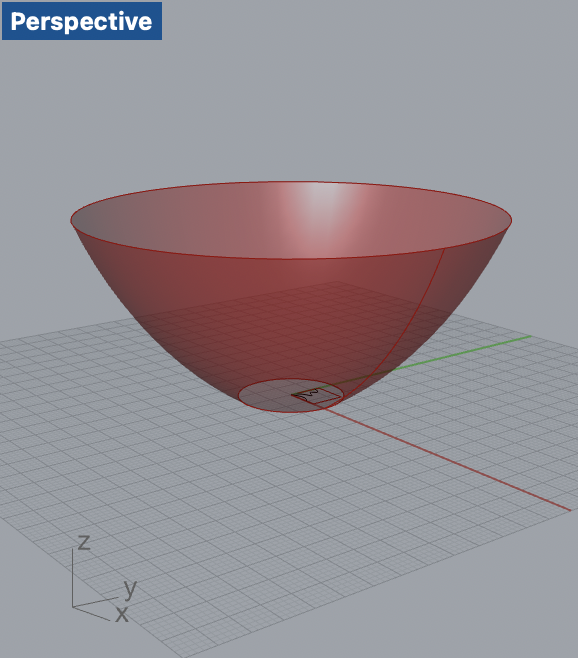
The third and final part of this assignment was focused on taking the 2D tiling concept to a new level by applying it to a 3D surface, creating a morphed pattern across a curved form.
Designing the Escher Surface Morph
Utilizing the star-shaped Escher tiles I that was used in part 2 of the project, I crafted a pattern that appeared to overlap, creating a mesmerizing optical illusion. This effect was achieved by meticulously adjusting the placement and orientation of each tile to suggest depth and interlocking, despite the tiles being on the same plane.
My grasshopper code allowed me to control the tiling across the surface. I used the left and right Python blocks to generate the tiling lattice and manipulate the tiles’ placement and coloring. The alternating yellow and green colors added another layer of visual complexity, enhancing the 3D illusion of the tiles.
Implementation and Morphing
With the pattern ready, I proceeded to create a 3D bowl-like vessel. This shape was chosen for its simple yet good looking curvature, which would test the adaptability of the tiling pattern. I morphed the Escher tiles onto the vessel’s surface.
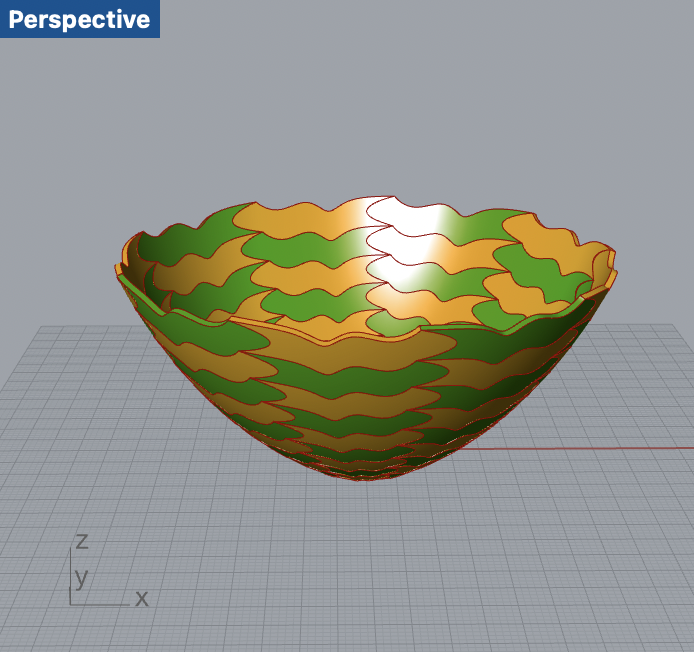

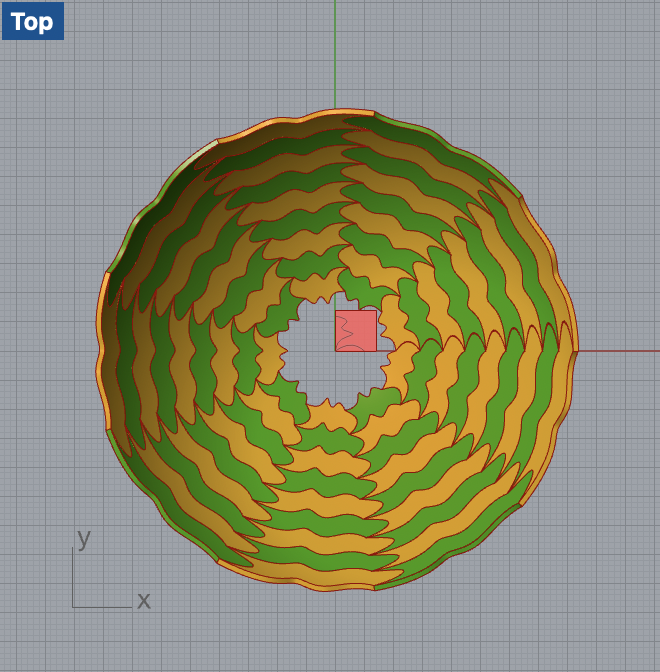
The morphing process required several iterations to get right. The tiles needed to be flexible in terms of size and shape to accommodate the surface’s curvature without losing their defining characteristics. I adjusted the code to allow for these modifications, ensuring that the tiles remained recognizable and the pattern coherent.
Challenges and Learnings
Adapting a 2D tiling pattern to a 3D surface posed a unique set of challenges. The most significant was ensuring that the tiles conformed to the vessel’s curved shape without stretching or compressing in an unappealing way which became more complex on a non-planar surface.
This part of the project was particularly enlightening in terms of understanding the properties of surface morphing. I learned the importance of flexibility in design and the need for a deep understanding of geometry and spatial relationships when working with complex forms.
Conclusion
This project was a journey that intersected the realms of mathematics, art, and design through the medium of computational design. From the meticulous crafting of 2D Escher-esque tiles that seamlessly cover a plane, to the translation of these patterns into 3D printed tiles that manifest as tangible artifacts, and finally, to the application of these designs onto a curved surface, each phase of the project pushed the boundaries of conventional tiling.
Code
Hi Daniel, I really liked your 3d printed tiles. They seem to have dimension that overlaps and I thought that looked very neat. Also your triangular lattice pattern looks very cool. I really struggled with creating the 2D triangular pattern. Well done!
Thank you Michaela! It took me a while to figure out the 2D triangular pattern too.
Hey Daniel,
I really like your 3d tiles, they really do look like mini mountains! Its pretty cool to see how such simple curves added to the tiles can make such interesting shapes. I like that you kept the same tile from 2d to 3d to the surface morph its interesting to see how different the same tile could look depending on the use. Nice work!
Hi Daniel,
For your 3D tiles, I really appreciate your use of the shape and lofting to create an interesting shape in an ingenious way. Adding some randomness to where the smaller top shape is placed could make some pretty cool visuals when tiled together I think! Great job!